
|
|
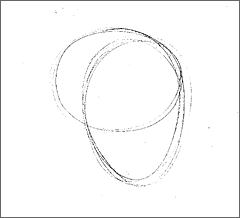
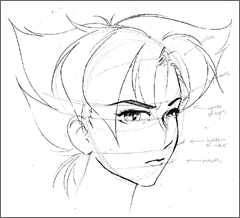
Starting with the basics Lightly draw a vertical oval or egg-shape. If you don't get the right shape the first time around, keep going, just don't get too dark with your pencil lines. Then draw a slightly more circular oval so the right side of it is about adjacent to the upper right "corner" of the oval/egg-shape. These shapes will define the mass of Konoko's skull. |
|
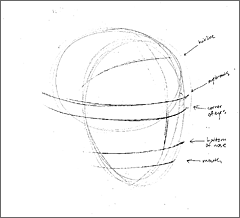
Dividing lines Draw a curved horizontal line along the equator of the first oval. This line will be where the corners of her eyes go. Draw another one above it about a quarter of the way from the center to the top. This will be where we'll put her eyebrows. Then draw a curved line, a very shallow backwards C, going from the top of both ovals to the bottom. This will be the line down the center of her face (since she's looking to the right, this elongated or shallow backwards-C should be pretty close to the edge of the face). Draw another curved line that splits the lower half of the face. This line will be the bottom of her nose. Then draw another line that splits the bottom portion to define where her mouth will go. Oh, and her hairline should be halfway up from the eyebrows to the top of the skull. |
|
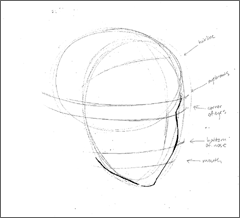
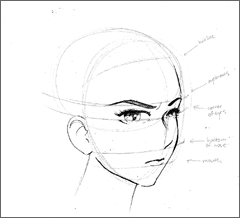
The outline From here on it gets complicated. I usually begin with the side of her face starting just above the far eyebrow to the bottom of her chin. I make a very shallow S, putting the first "dent" right where I drew the guideline for the corner of her eyes. Then I come back out, following the oval guidelines down, bringing the line in at a real shallow curve to the left just past the nose line. I jut the chin slightly to the right before I continue my line to the left along the oval but straighter to give Konoko a slight angle to her jaw. Don't forget to add the line for her forehead (I usually add that before I do the hair). |
|
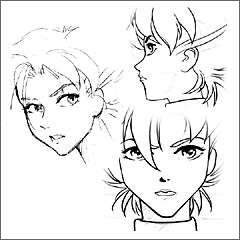
Anime lines What makes a face anime-like? The common thing to say is "big eyes" --- This is to help the character be more expressive (Disney does the same thing. And the shape and size of eyes usually reflects the personality type of the character). But big eyes isn't all there is to an anime-style character. Like with any animation, the simpler the lines the easier it is to animate - which means different people can draw it several hundred times in a day and not have it look too different from one frame to another. It's how the lines of the face are simplified that makes it anime-like (at least in the more general sense of the word. See Figure A). |
|
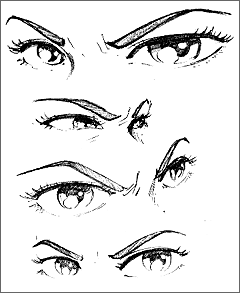
Eyebrows Draw the angled eyebrows on top of the eye-brow guideline. Remember that the eyebrow away from you should be shorter and the angle sharper than the one towards you. The thicker part is lower than the thin part and should be towards the bridge of the nose. The more you tilt it and bring closer to the eye-guide-line, the more angry Konoko will look. You can put the creases on her forehead for such a frown if you like. (See Figure B for various Konoko expressions)
Eyes |
|
Nose Most anime noses merely suggest the shape of the nose, or rather, the shadow that the nose casts on the face. For this exercise, draw a slightly curved line that start from the intersection of that vertical shallow backwards-C and the nose-guide-line and go up to the right diagonally. This will suggest the bottom of the nose. The line for the bridge of her nose should start on the line that goes down the center of her face just above where you drew her upper eyelid and shouldn't go too far down.
Ear |
|
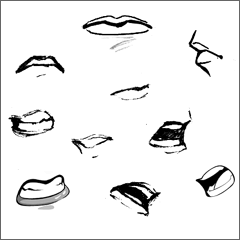
Lips The lips shouldn't be too far from the bottom of the nose. I drew the bottom of the bottom lip on the lip-guide-line. Notice that that dip at the center of the upper lip is also on the line defining the center of the face. Konoko's lips are generally thin, particularly the upper lip. |
 |
Neck Oh yeah, let's draw the neck in. The back should be behind the ear, the front should be coming from the bottom of that oval, behind her chin. Don't' make the line too straight or she'll look a bit mechanical and stiff - don't make it too short because then she'll look brutish, or too long and she'll look fragile..
Hair And that's it! If you want to get real good at drawing, you keep on practicing! |
© Oni Central 2000